| | Graphics : Drawing Packages |
|
Drawing packages overcome many of the limitations of painting packages. They make it easier to edit images and can store images in much smaller files. Images produced this way do not look blocky (pixelated) if enlarged. Drawing packages are also known as vector drawing packages.
Drawing packages do not store images by remembering the colour of each pixel in the image. Instead an image in a drawing package is built up from a number of shapes or objects. The drawing package remembers the position, size, shape and colour of each object that you place onto the image.
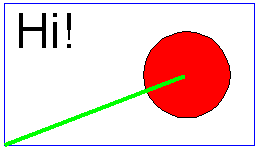
For example this image :

would be stored as a definition similar to this one :
Basic Features of a Drawing Package
Because a drawing package remembers all of the information about each object you can easily change the appearance of the objects and hence the image.
A drawing package will provide these extra editing features :
| Resize Object | Using the mouse an object can be stretched or shrunk in any direction. |
| Rotate Object | Using the mouse an object can be rotated to appear at a different angle in an image. |
| Move Object | Objects can be moved around the screen to see how they look in different positions. |
| Delete Object | Unwanted objects can be easily deleted. |
| Change Object Properties | Each object will have a number of properties. The properties will depend upon the type of object. For example a rectangle will have two colours (fill colour and line colour) as properties. These properties can easily be changed. |
A drawing package will also offer all of the tools that a painting packages does with the exception of a freehand brush and flood fill which will not be available.
Objects stored as part of a drawing are stored in layers on top of each other. In the example image above, the layer that the green line is stored in must be on top of the layer that the red circle appears in because the line is in front of the circle. Drawing packages usually provide functions to move objects between layers.
| Move to back | Moves the selected object to the layer at the back of the image so it will appear behind all of the other objects. |
| Move to front | Moves the selected object to the layer at the front of the image so it will appear in front of all o the other objects. |
Several objects can be grouped together so that they can edited as if they were a single object. For example several objects may be used to build up an image of a car. These objects could then be grouped together. Once grouped together all of the objects in the car image could be stretched, copied and moved as if they were one single object.
Accurate Positioning of Objects
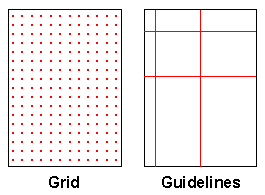
To achieve a professional appearance it is important to be able to position objects very accurately onto the page. Two tools are usually provided to help you position objects accurately. They are guidelines and grids.
| Guidelines | Guidelines are lines which are placed onto the page to help the user position objects. The user can place guidelines anywhere on the page. Any object placed near to a guideline will "jump" or "snap" to the guideline. i.e. the object will move to line itself up exactly with the guideline. The guidelines will appear on the screen but will not appear on the final printed image. |
| Grids | A grid of points can be placed over an image. The points are placed at regular intervals specified by the user, for example every one centimetre. Whenever an object is placed on the image it will jump to the nearest point on the grid. |

GCSE ICT Companion 04 - (C) P Meakin 2004